Project Settings#
The Project Settings tab will be visible when there is an active project.
These settings will be stored in the \00_Pipeline\pipeline.json file in your project and will affect every user who opens this project.
Similar like in the User Settings, there are categories on the left side and their settings will be displayed on the right side when selected.
Departments#

Here you can configure which departments and tasks are available for your assets and shots.
You can reorder the departments by dragging the row numbers and create, remove or edit departments using the context menu.
The task presets let's you define, which departments will be created for specific types of assets and shots.
Environment#

Here you can specify environment variables, which will be set for every user who opens this project.
These environment variables can be used by other tools in your pipeline.
Note
There are some environment variables in Houdini, Maya and other DCCs, which allow to specify additional plugin paths.
These env vars need to be set when before the DCC gets initialized and won't have an effect when specified in the Prism User Settings.
To start a DCC with these environment variables, please use the Prism Launcher.
Folder Structure#

Here you can modify the templates, which define the folder structure and naming conventions in your project.
For more advanced customizations you can use Python expressions as templates (rightclick -> "Edit Expression...").
Each template usually includes one or more variables, which get replaced with a value when the template gets evaluated in a specific context.
The available variables are different for each template and can also vary depending on the loaded plugins.
To see a list of variables, which are available for a template, rightclick the template, choose "Edit Expression..." and add
core.popup(context).Then restart Prism and perform an action, which evaluates the template. Prism will show a popup with all variables, which are available in the current context.
Note
Each folder structure template has a list of variables, which are expected in the template.
You can see a list of expected variables in the tooltip of the template help when you hover over question mark on the right side of the template.
This is to ensure that you don't break the Prism GUI accidentally.
If you know what you're doing you can disable this check by setting the environment variable
PRISM_ENFORCE_FOLDER_STRUCTURE_RULES to 1 in Prism v2.1.2 and newer.In older versions you can rightclick the template -> "Edit Expression..." and add a line like
"@variable_name@" in a new line at the end of the expression to avoid warning popups about an invalid folder structure.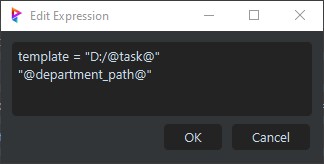
General#

Here you can configure various project settings:
- Project Name#
- The name of the project will be displayed in various places like in the window title of the Project Browser or in the list of recent projects.
Note
The project name doesn't need to be included in the project path.
- Project Path#
The path from where the project is currently loaded (read-only).
- Image#
The thumbnail of the project, which will be displayed in the list of recent projects.
- Use additional local project folder#
- If this option is enabled, Prism will save many files in a project folder on the local workstation instead of in the main project folder.When publishing new files, the artist can decide if the version should be saved in the local folder or in the main/global project folder.It's also possible to move versions between different locations after the publish.This can be used to keep the main project folder clean and lightweight, while storing less important files locally.
- Use master product versions#
- If this option is enabled, every product will have an additional master version besides the numbered versions.A master version is a copy of one of the numbered version (usually the latest version), but the version number is replaced by the term "master".This master version can be referenced in scenefiles and if the master version gets updated later on, the scenefiles will automatically reference the new update without updating any paths in the scenefiles.This workflow is called a "Push Workflow" (new updates get pushed into downstream scenefiles) compared to a "Pull Workflow" when this option is disabled.
- Use master media versions#
- The same as "Use master product versions" just for media versions.
- Use Episodes#
- If this option is enabled, all sequences will be grouped into episodes.This setting affects the folder structure and shouldn't be changed in the middle of a project.
- Backup scenefiles on publish#
- If this option is enabled, a copy of the scenefile will be saved in each product and media version folder, which gets created from the scenefile.
- Enable scenefile locking#
- If this setting is enabled Prism will "lock" a scenefile when a user opens it.When another user tries to open that scenefile, Prism will let the user know that this file is being used by another user.When the fist user closes the scenefile, the lock gets released and other users can open the scenefile again.This "lock" is more a information for the user than an actual restriction.Users can decide to ignore the warning and continue to open the scene (which can be useful to view the scenefile content without modifying it).
- Link Products and Media to tasks#
- If this option is enabled, products and media identifiers will be created under a department and a task folder.The department and task name will be taken from the currently open scenefile at the time when a product/media version gets created.This option changes the folder structure and should not be changed in the middle of a project.
- Match product/media version to scenefile version number#
- If this option is enabled, newly created product and media versions will use the version number of the scenefile from which they were created.If this option is disabled the product/media versions will be calculated by the highest existing version in a given product/identifier incremented by 1.
- Require publish comment#
- If this option is enabled, the user is required to enter a publish comment in the State Manager before he can publish files.The minimal length of the comment can be defined.If this option is disabled, the user can publish without any comment.
- Track dependencies#
- This option defines when Prism stores information about all external files, which are referenced in the currently open scenefile.The available options are "Always" (on every save), "On Publish" and "Never".The dependencies are stored in the versioninfo.json file next to each scenefile and can be viewed by opening the "Dependency Viewer" from the context menu in the Project Browser.
- Frames per second#
- This setting defines, which FPS value will be used for the project.Prism will warn the user if a scenefile gets created or opened with a different FPS value.
- Resolution#
- This setting defines, which resolution value will be used for the project.Prism will warn the user if a scenefile gets created or opened with a different resolution value.
- Version Padding#
- This value defined how many digits are used in version names in the whole project.
- Project Version#
- This values sets the version of the project.Usually this is equal to the Prism version, with which the project was created.Prism uses this value to make sure that features of newer Prism versions, which are not backwards compatible, are not activated in old projects.
- Required Plugins#
- This is the list of plugins, which must be loaded in Prism in order to open this project.If a user doesn't have the required plugins loaded, he won't be able to open this project.
- Expected Project Path#
- This paths defines the absolute folderpath, which should be used to open this project.If the project is loaded from a different path, Prism will display a warning to the user.It's highly recommended that all users, who are working on a project are using the some project folderpath.Otherwise filereferences can break when sharing files between different users.Tools like Visual Subst can be used to map folders to drive letters to ensure uniform project folder paths even with different hardware configurations.
- Import/Export#
- These buttons let you export and import the project settings to/from json files.
Hooks#

This section lets you define custom Python scripts, which get executed at specific events (callbacks).
Here you can find a list of available callbacks.
Locations#

Here you can configure additional export locations for products and render locations for media.
When exporting/rendering from the Prism State Manager, you can choose if you want to save the generated files in the main project folder or if you want to save then in one of the additional location defined in these project settings.
Prism will then create all required folders for assets, shots, versions and others under this additional location.
This can be useful if you want to store heavy FX caches or renders on a different drive than you main project folder.
Preset Scenes#

In this category you can define preset scenes, which will be used to create a v0001 of a scenefile, when a task gets created in Prism.
The text field set the name of the preset scene to be used.
A preset scene with this name needs to be available in your project.
The settings on the right side of the name let's you configure for which assets, shots, departments or tasks this preset scene should be used to create a v0001.
Note
This category is only available with a Prism Plus or Pro license.
States#

In the "State Defaults" section you can configure the default settings of specific state types in the State Manager.
These default settings will be applied every time a state with this type will be created in this project.
You can also configure to apply these defaults only when the scenefile is saved in specific assets, shots, departments or tasks.
In the "State Presets" section you can configure presets, which can include one or more different state types with configured settings.
For example you could create a preset for the animation department, which creates an export state to export alembics, a second export state for an fbx export and a playblast with a specific resolution.
This preset can then be applied automatically to all new scenefiles, which will be created under the animation department in this project.
Note
This category is only available with a Prism Plus or Pro license.
Additional Categories#
For an example how to add new categories using a custom plugin, see this example.