Media Extension#
The Media Extension plugin allows artists to quickly convert different media formats.
Feature Overview#
The Media Extension plugin has currently 2 main features:
A Media Converter, which allows to convert between different fileformats, resolutions, colorspaces and add burn-ins. The conversion settings can be saved as presets and can be applied automatically to generated playblasts or renders.
Initial support for specifying an OCIO config for color management. See OCIO Workflow for more details.
Installation#
As any other plugin the Media Extension plugin can be installed with the Prism installer or using the Prism Hub. To verify the plugin is installed and loaded you can check the "Plugins" tab in the Prism User Settings and search for the "Media Extension" plugin in that list.
Media Converter#
Overview#
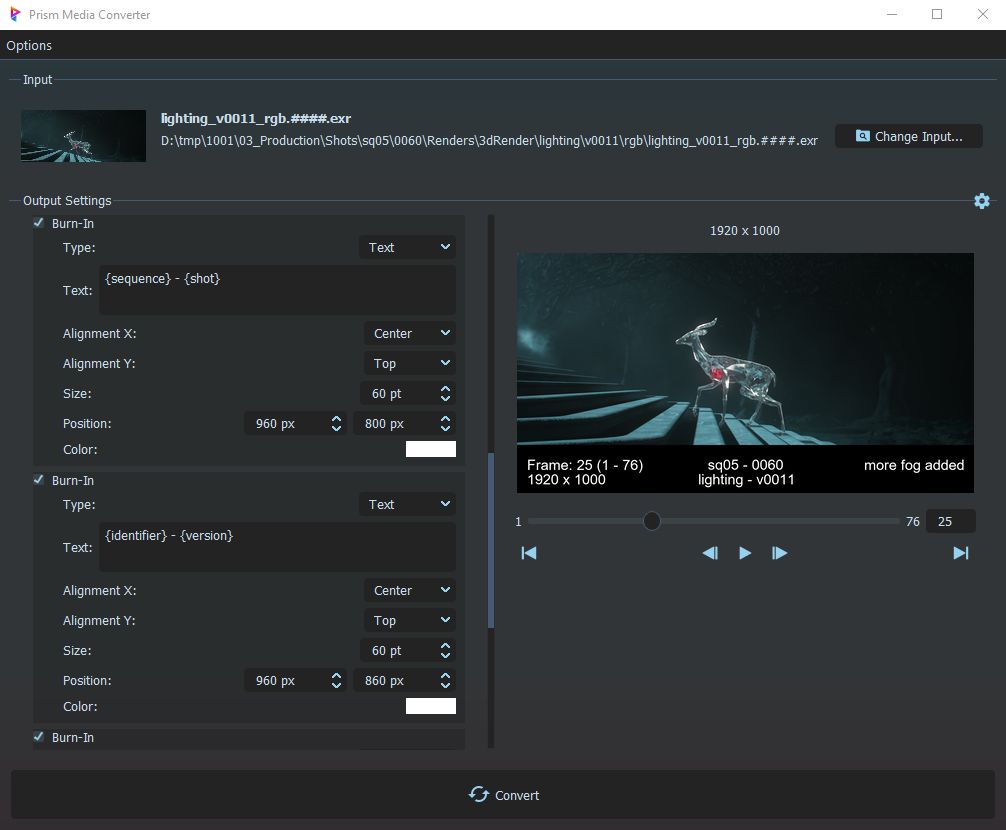
The media files, which are going to be converted are shown at the top of the Media Converter. On the bottom left there are the output settings like the output fileformat, colorspaces and more. On the bottom right there is a preview, which shows how the converted media will look like with the current settings. This preview gets updated every time an output setting gets changed.
Opening the Media Converter#
There are multiple ways how to open the Media Converter:
From the "Options" menu in the Prism Project Browser choose "Open Media Converter..."
In the "Media" tab in the Project Browser you can rightclick any media and in the "Convert" menu you can choose "Custom...".
Using the Prism Launcher plugin. In the settings menu of the Launcher choose "Detect apps on computer...". This allows you to add the Media Converter to the Launcher.
Using Python. If you want to open the Media Converter from a custom tool or plugin you can do that using the following Python code:
core.getPlugin("MediaExtension").openConverter()
Modes#
The Media Converter has 3 modes, which can be toggled from the main menu bar.
Simple: This is the default mode. It provides a clean and simple interface with the most important settings. It allows to have one media input and one modifier of each type.
Advanced: In this mode it is possible to add multiple media inputs, each with it's own output settings. It's also possible to add multiple modifiers of the same type. This can be especially useful with the burn-in modifier.
Edit Presets: This mode allows to edit settings and load/save presets without the need to have an input widget.
Adding input media#
Media inputs can be set by drag&drop media into the input area of the Media Converter or by using the browse button to select files in a file explorer. Images, sequences and videos are supported. File sequences will be detected automatically. In the advanced mode multiple media inputs can be defined. Each has it's own settings and each input will be converted in a queue.
Output settings#
In the output settings an output path can be set. Relative paths can be used, which will save the output files relative to the input files. The fileformat extension will be appended automatically. Currently these output formats are supported: .jpg, .png, .exr, .mov, .mp4, .bmp, .dpx, .gif, .hdr, .tga, .tif, .tx Some fileformats have unique settings like quality, compression or framerate. These settings will become visible when the format is changed in the dropdown menu.
Modifiers#
- Crop#
- This modifier can crop a specific amount of pixels from each side.Negative values are possible and will extend the output image.
- Scale#
- The scale modifier allows to scale the input image up or down.There are presets for 50% and 25% and it's also possible to scale it to a custom resolution.If the aspect ratio of the custom resolution is not locked it can result in a stretched output image.
- Color Conversion#
- The Color Conversion modifier converts the input from an input color space to an output color space.The available color spaces are defined by the current OCIO environment variable.
- Burn-In#
- The Burn-In modifier will add text, a rectangle shape or an additional image on top of the image.This modifier provides settings for position, size and color.This can be used to add information about the media directly into the pixels.In order to use multiple Burn-In modifiers the advanced mode of the Media Converter can be used.Variables can be used When using the text burn-in to generate the burn-ins dynamically.The variables need to be inserted between curly brackets.Available variables include: frame, start, end, rel_frame, num_frames, width, height.Additionally meta data from the media input version can be used as variables like asset, sequence, shot, comment and more.
- Slate frame#
- The Slate frame can be used to add an additional first frame to the media input.This can be useful to list all the details of the media input such as sequence, shot number and department.While the slate frame is shipped with a default preset, there is the option to create and save custom presets.
Managing presets#
PRISM_CONVERSION_PRESET_PATHS and PRISM_CONVERSION_PRESET_SEARCHPATHS environment variables can be used to make presets available from custom locations, like a shared studio library.Automatically convert playblasts and renders#
Project Settings#

- Current OCIO#
- Displays the current value of the OCIO env var.The "Make persistent" button lets you set this env var value in the Windows system settings, which will affect applications system wide.
- Set OCIO#
- If checked, Prism will set the OCIO env var to the selected config.
- Clear OCIO env var#
- If checked, Prism will unset the OCIO env var if it has an existing value.
- Set OCIO colorspaces#
- Let's you define default colorspaces, which will be used in the Project Browser thumbnails and when converting and publishing media to Shotgrid, ftrack or Kitsu.
- Show default conversion presets#
- Defines if the default media conversion presets will be displayed in various places in Prism.If disabled, only custom presets will be displayed.
- Enforce OCIO in Nuke#
- If checked, Prism will ask the user to enable the OCIO color management in Nuke if it is not already enabled.